Next.js 14 の ImageResponse を使用して OGP 画像を動的生成する
Next.jsの標準機能であるImageResponseを使用して X や Facebook 等のポストで表示されるOGP画像を動的生成する方法を紹介します。
API の作成
./app/api/og/route.tsx を作成し中に OGP 画像を動的生成するコードを書きます。
import { ImageResponse } from "next/og";
import { NextRequest } from "next/server";

export async function GET(req: NextRequest) {
  const { searchParams } = req.nextUrl;
  const Title = searchParams.get("title");

  return new ImageResponse(
    (
      <div
        style={{
          height: "100%",
          width: "100%",
          display: "flex",
          flexDirection: "column",
          alignItems: "flex-start",
          justifyContent: "center",
          backgroundImage:
            "url(https://raw.githubusercontent.com/hyt-fjwr/hytfjwr/master/public/og/og.png)",
        }}
      >
        <h1
          style={{
            marginLeft: 205,
            marginRight: 205,
            display: "flex",
            fontSize: 120,
            letterSpacing: "-0.025em",
            fontStyle: "normal",
            fontWeight: "bold",
            color: "white",
            whiteSpace: "pre-wrap",
            backgroundColor: "rgba(15, 15,19, .5)",
            paddingLeft: "25px",
            paddingRight: "25px",
            borderRadius: "25px",
          }}
        >
          {Title}
        </h1>
        <h2
          style={{
            marginLeft: 205,
            marginRight: 205,
            display: "flex",
            fontSize: 50,
            letterSpacing: "-0.025em",
            fontStyle: "normal",
            fontWeight: "bold",
            color: "white",
            whiteSpace: "pre-wrap",
            backgroundColor: "rgba(15, 15,19, .5)",
            paddingLeft: "25px",
            paddingRight: "25px",
            borderRadius: "25px",
          }}
        >
          Hayato Fujiwara
        </h2>
      </div>
    ),
    {
      width: 1920,
      height: 1080,
    }
  );
}
上記のように ImageResponse では div タグ内でスタイリングをします。
API の呼び出し
API が完成したので実際に各ページで呼び出してみましょう。 例として / ページの OGP を設定するために./app/layout.tsx 内に記述していきます。
//省略...//
export const metadata: Metadata = {
  title: "Hayato Fujiwara",
  description:
    "My portfolio created with Nextjs, Radix Primitives, Framer Motion, Tailwind",
  openGraph: {
    title: "Hayato Fujiwara",
    description:
      "My portfolio created with Nextjs, Radix Primitives, Framer Motion, Tailwind",
    type: "website",
    url: "https://hytfjwr.com",
    images: [
      {
        url: "https://hytfjwr.com/api/og?title=hytfjwr.com",
        alt: "hytfjwr.com",
      },
    ],
  },
};
//以下省略...//
ページの title や description を設定する Metadata に openGraph という項目を追加し中身の images の中に作成した API の URL を記述します。
API では title というパラメータを追加していたの URL へのパラメータ追加も忘れずにしましょう。
完成画像
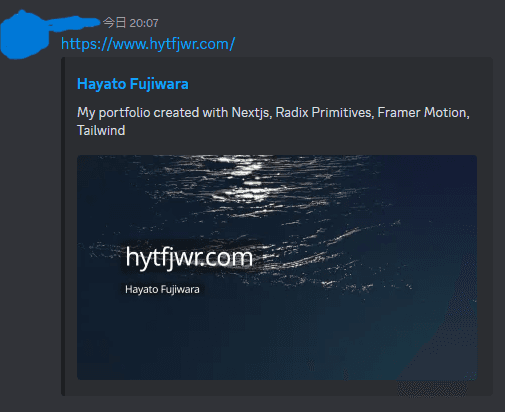
Discord での確認ですが上記のような画像が自動生成され、OGP 画像として設定されます。 これにより各ページ(pages.tsx)に Metadata を設定することで、ページ別で違った文字を挿入した画像が OPG 画像として設定できます。
全体的な流れとしては以上です。